Orchids are known for their stunning beauty and elegance, but they can be a bit tricky to care for. One of the most common issues that orchid owners face is root rot, a condition that can quickly jeopardize the health of your beloved plant. If you’ve noticed signs of root rot, such as wilted leaves or a foul odor, don’t despair! With the right approach, you can save your orchid and keep it thriving for years to come.
Quick Answer
To save an orchid with root rot, remove the plant from its pot, trim away the affected roots, and repot it in fresh, well-draining medium. Ensure proper watering and care afterward to prevent recurrence. Regular monitoring will help keep your orchid healthy.
Understanding Orchid Root Rot
Root rot is a fungal or bacterial condition that occurs when the roots of your orchid sit in overly wet conditions for too long. Here’s a closer look at how it develops and why it’s crucial to address it promptly.
What Causes Root Rot?
- Overwatering: Orchids thrive in well-drained environments. Excessive watering can lead to soggy roots.
- Poor Drainage: Using the wrong potting medium or pot can hinder drainage, causing roots to rot.
- Low Light Conditions: Insufficient light can weaken the plant, making it more susceptible to rot.
- Fungal Infections: Certain fungi thrive in wet conditions, attacking already stressed roots.
Identifying Root Rot in Orchids
Knowing how to identify root rot early can save your orchid. Look for the following signs:
- Dark, mushy roots: Healthy roots are typically firm and green or white. If they are black or brown and feel soft, they are rotting.
- Wilting leaves: Leaves may droop or appear shriveled due to insufficient nutrient uptake.
- Foul odor: A rotten smell is often a telltale sign of decaying roots.
- Yellowing or browning leaves: This can indicate stress or damage to the root system.
Steps to Save an Orchid with Root Rot
If you suspect root rot, it’s time to take action. Follow these steps to help revive your orchid.
1. Gather Your Supplies
Before you start, make sure you have the following supplies on hand:
- Potting medium (orchid bark or sphagnum moss)
- Clean pot with drainage holes
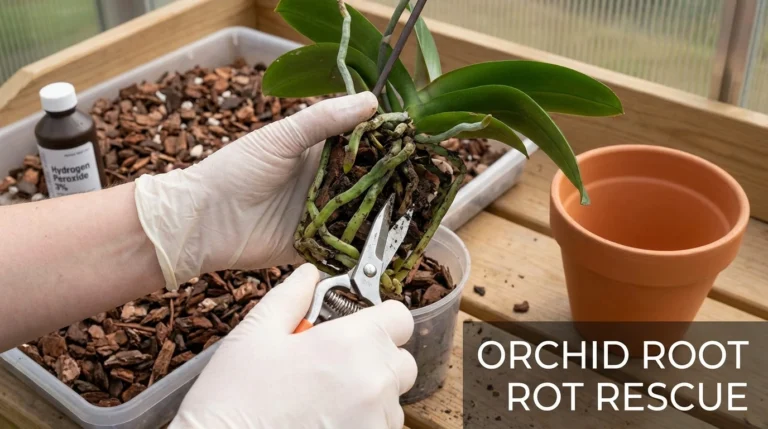
- Sharp, sterile scissors or pruning shears
- Hydrogen peroxide (optional, for disinfecting)
- Gloves (to protect your hands)
2. Remove the Orchid from Its Pot
Gently take your orchid out of its pot. Be careful not to damage the roots further. If the plant is stuck, you may need to gently wiggle it or tap the pot’s sides.
3. Inspect the Roots
Examine the roots closely. Healthy roots are firm and have a greenish color. Remove any roots that appear brown, black, or mushy. Cut them back to where they are healthy, using your sterile scissors.
4. Treat the Remaining Roots
If you’ve cut away a significant number of roots, consider dipping the healthy roots in a solution of hydrogen peroxide to disinfect them. This can help prevent any lingering fungal issues.
5. Prepare the New Potting Medium
Choose a fresh potting medium designed for orchids. Ensure it is well-draining. If you’re using bark, soak it in water for about 30 minutes before potting to give the roots some moisture.
6. Repot the Orchid
Place your orchid in the new pot and fill it with the prepared potting medium. Ensure the roots are spread out and not tightly packed. Leave enough space for air circulation.
7. Water Sparingly
After repotting, water your orchid lightly. Allow the medium to dry out before the next watering. This helps establish the roots in their new environment without overwhelming them.
Preventing Future Root Rot
Once you’ve saved your orchid, it’s crucial to take preventive measures to avoid future occurrences of root rot. Here are some tips:
1. Water Wisely
Watering is one of the trickiest aspects of orchid care. Here are some guidelines:
- Water once a week or when the top inch of the medium feels dry.
- Always use room-temperature water.
- Water in the morning to allow excess moisture to evaporate by evening.
2. Ensure Proper Drainage
Choose pots with adequate drainage holes. Consider using a potting mix specifically designed for orchids to enhance drainage.
3. Provide Adequate Light
Orchids need bright, indirect light. Too little light can stress the plant and make it more susceptible to rot. Place them near a window with filtered sunlight.
4. Control Humidity
Orchids thrive in humid environments. Aim for a humidity level of around 50-70%. You can increase humidity by:
- Using a humidity tray filled with water and pebbles.
- Grouping plants together to create a microclimate.
- Using a humidifier.
5. Regularly Check for Pests
Pests can stress your orchid, making it more vulnerable to rot. Regularly inspect your plant for signs of pests such as aphids or mealybugs.
Expert Tips for Orchid Care
Here are some insider tips to help keep your orchids healthy and thriving:
1. Fertilize Wisely
Use a balanced orchid fertilizer during the growing season. Fertilize every two weeks, then reduce to once a month during dormancy.
2. Rotate Your Plants
To ensure even growth, rotate your orchids every couple of weeks so all sides receive adequate light.
3. Be Patient
Orchids can take time to recover from stress. Be patient and give them the care they need to bounce back.
Common Questions (FAQ)
Can I save my orchid if it has root rot?
Yes! By removing affected roots and repotting the orchid in fresh medium, you can often save it.
How can I tell if my orchid is overwatered?
Signs of overwatering include yellowing leaves, soft or mushy roots, and a foul odor from the potting medium.
What type of potting medium is best for orchids?
A well-draining medium, such as orchid bark, sphagnum moss, or a commercial orchid mix, is ideal for orchids.
How often should I water my orchid?
Generally, you should water your orchid once a week, but always check the top inch of the medium first to see if it’s dry.
Is it normal for orchid roots to be exposed?
Yes, orchid roots can naturally grow above the medium. Just ensure they are healthy and not rotting.
Conclusion
Saving an orchid with root rot may feel daunting, but with the right steps and a little patience, you can bring your beautiful plant back to life. Remember to monitor your watering habits, ensure proper light and humidity, and regularly check for pests. With these practices in place, your orchid can thrive and continue to bring joy to your home. Happy gardening!